Showing posts with label windows. Show all posts

Monday, September 7, 2015

Installing and Using Ruby Interactive Shell on Windows

      Ruby is dynamic,interpreted, object oriented programming languages which is one of the easiest programming language to learn and with Rails its just might be the best web development option at the moment. Ruby intsallation is pretty much simple in windows, Linux and you don't have to install Ruby on Mac. It already has Ruby installed in it.

   Step by step guide to install Ruby on your PC:
  1. Go to Ruby programming language homepage: https://www.ruby-lang.org/en/
  2. Click downloads
  3. Click on Installation-->click on RubyInstaller(Windows)-->Ruby installer-->Download
  4. Select the top selection there that will be the current version of Ruby 
  5. Click save file. let it download
  6. Now double click the file-->accept license agreement-->Install-->finish.

Using Ruby Interactive Shell 

        The interactive shell  or just a shell allows us to type Ruby statements or expressions at the command line and gives immediate result. So open the command prompt and navigate to the folder where Ruby is installed and type "irb".


On ruby shell single number evaluates itself. We can perform simple arithmetic operations the ways show above screenshot. Strings also evaluate to them self, We can perform concatenation operation between two strings using '+' operator as shown below :


         We can also store data in variables and use it later as shown in below "greet' is variable which stores value "good morning". After typing good morning it returns "good morning".


   We can also concatenation "greet" with other value 


    We can write more complicated expressions in ruby shell. We can create functions for example square function in bellow example. Here I wrote my own user define "sqr" function to find square of a number.
 
   
     If you have good understanding of function you not even have to write return statement. lets consider following function for addition of two numbers. In which I wrote add method for addition of two numbers when next time I write add(2,2)  it performs addition of these two numbers which is 2+2=4.


Sunday, September 14, 2014

Learn how to hack hathway internet on your windows xp/7/8/8.1

Learn how to hack hathway internet on your windows


Welcome all to our blog of itsitrc, this article is for learning the hack for internet access or it can be used to share the internet of same account. Hacking is not good but using it for some useful purpose can propose a way to use and share efficiently. Use following information study purposes, if you get caught in doing such activity you may go through Cyber law, so this article is not responsible for your activity.

Let’s start with the Procedure:

Learn how to change MAC address in windows 8 and Windows 8.1

Learn how to change MAC address in windows 8 and Windows 8.1


MAC address is combination of Hexadecimal values:

Just follow the below pictorial directions and you will be through:


1. Go to Control Panel.

Wednesday, February 26, 2014

Shared Memory between Bluestacks and Windows

Hii friends, I would like to share something which may be helpful to you. As everybody know about the Bluestacks (famous Android Emulator for Windows). Most of our friends may be facing the problem of sharing files between Bluestacks and our hard disks. So lets see the method of exchanging files:

Thursday, February 13, 2014

How to record screen activity in windows 7 with free software tool


Hello all , this article is dedicated for making a screen capturing activity as well as snapping current window screen situations in windows 7.


Name of this software tool is "Free Screen Video Recorder". While pursuing this software tool settings are supposed to be done prier then recording a video.Default Quality is low i.e. Microsoft Video ,but best thing would be going for "Cinepak Codec by Radius". okay, let's take it from the top.


Monday, December 30, 2013

Extending Time limit to pick an OS in the GRUB Menu


Every one of my friend might be some inconvenient about the time they missed for choosing an OS in the GRUB menu. So not to worry friends, i have some simple steps to be followed for changing the time limit that we hate.


Tuesday, October 1, 2013

Getting Android 4.3 on Samsung Galaxy S2 GT-i9100 -- Part 1

Part 1 - Rooting Your Phone

Galaxy S2 GT-i9100


All the people who have Samsung Galaxy S2 with them will not be getting an update to Android version 4.3 Jellybean from Samsung Galaxy S2 GT-i9100. But you can always flash the Jellybean firmware by flashing the firmware manually. After flashing you may not get the look of Samsung phone, but you will be having the latest firmware running on your device with the looks of Google Nexus. And its really worth it, as you get all the features of latest version of Android. But the downside is, your phone would be Rooted.

Saturday, August 24, 2013

XAMPP: A web server package

XAMPP is a cross platform web server package. Cross platform means it works on every possible operating system without any compatibility issues. XAMPP is the acronym for: X-cross platform, A- Apache HTTP server, M- MySQL, P-PHP, P- Perl. The main advantage of XAMPP is that it requires very less configuration for its components, which make it quite user friendly. The default FTP user for XAMPP is "newuser", and default FTP password is "wampp". Similarly default MySQL user is "root", and there is no default password for MySQL.
XAMPP contains its own XAMPP Control Panel, where all the modules and their current status is given. We can very easily start or stop any module which we want, by clicking on "Action" button beside modules. We can even configure the modules. A small pop-up screen appears when we click on "config" button.
There is one main config button on top right side.  When we click on that main config button on top right corner then the following window will appear.
Below all this modules there is a terminal which displays the actions and generate a log file which we can view by clicking on logs. There are several different XAMPP distributions, 1. XAMPP for Linux, 2. XAMPP for Windows, 3. XAMPP for Mac OS X, 4. XAMPP for SOLARIS. Installing XAMPP is also very simple task in windows 8 just download the zip file and extract it and double click on .exe file. The folder name xampp will be created in C drive. So basically XAMPP is very user friendly and easy to use cross platform web server.

XAMPP is developed by Apache Friends and the Official website for XAMPP is  www.apachefriends.org/en/xampp.html

Thursday, August 1, 2013

Run Android Apps on desktop


Have ever felt like running an Android app on your Windows machine? Using BlueStacks, you can easily get apps from your Android device to your desktop or laptop without any complicated set up or fussing with the Android SDK.

Android Apps on Windows:

BlueStacks is essentially a self-contained virtual machine that runs Android apps on your Windows 7 computer. While it’s still in alpha, it’s surprisingly stable, pretty novel, and constantly improving. It has very little set up and runs quite nicely smoothly, albeit with a few limitations. The biggest appeal is that you don’t have to deal with the Android SDK – or even know what that is, really – and so it’s great for beginners. You can easily install apps available from BlueStacks list of free apps, and if you have an Android device, you can install many apps from your device via the Cloud Connect app. Why would anyone want to do this? Well, suppose you have an app that you really like and there’s no proper desktop equivalent. You can run it on your main computer instead of on your tiny little Android phone. Or, perhaps you’re thinking about buying a tablet, but you’re not sure what apps you’d like. You can try out many of the free apps that BlueStacks provides, or get a friend with a tablet or phone to show you the apps they use. You can play around with those apps on your desktop or laptop and see if you like them before you buy something you may or may not use. It’s pretty great for developers who want to demo their app, but for some reason don’t have access to a PC with the SDK. You can use the standard mouse to navigate everything and it works pretty well, but if you’re lucky enough to have a touch-screen, then this works spectacularly. Some of the games may require nicer hardware but most apps run fine on their own. We tried this on a year-old netbook and things ran perfectly fine. There were a few hiccups here and there, but no crashes or major slowdowns.

BlueStacks Installation:

Installing BlueStacks is easy. Just head over to the download page and grab the installer. Currently, BlueStacks only runs on Windows 7. They seem to be working on a version for Windows XP and Vista as well as Mac OS X, so we’ll hopefully see those in the near future.

Fig1: Install Wizard


After the program is installed, the installer will ask if you would like to view an introductory video. It’s very short and gives you the basics of how the program works. BlueStacks installs a desktop gadget that acts as a launcher.
 

Fig2: Gadget

You can move this around and change the opacity like normal gadgets. To open up the launcher, just give this a left-click.


Fig3:Launcher

You’ll see the list of default installed apps. Click any one to launch it.


Fig4: Desktop Thumbnail

You’ll see the app come up like it would on an Android device. Just use the mouse like you would your finger, and if you happen to have a touch-screen, then you’re probably ecstatic.
As mentioned in the intro video, you can see that there are some icons on the bottom of your screen that you can tap.


Fig5:Button Introduction

These simulate the hardware buttons found on Android devices. There’s a few extra buttons that allow you to change the screen orientation and zoom level of the apps, as well as close the app out entirely. Actually, I found that you can drag from the top panel and the notification drawer comes down. There’s even a built-in browser for when you click on “help” links and the like.


Fig6:Browser Thumbnail

The onscreen-keyboard also pops up for text boxes. Normal PC shortcuts for copying and pasting and selecting all text do not work, however.


Fig7:Desktop rotation keyboard

Adding More Apps:

Fig8:More Apps

From the BlueStacks Launcher, you can click the Get More Apps link, which will open a browser window pointed to the BlueStacks Channels website.

 Fig9:Cloud Connect Pin

Here, you’ll see a 9-digit PIN for use with the Android Cloud Connect app. You can click on the Featured Apps link on the left to browse and subscribe to the free apps available from BlueStacks.

 Fig10:Featured Apps

Of course, the big feature here is that you can add apps from an Android device as well. To do this, install the BlueStacks Cloud Connect app from the Android Market.


Fig11:Cloud Connect Description

Once installed, launch the app and enter the 9-digit PIN that you found on the BlueStacks Channels website.
 
 Fig12:Bluestacks Connect

Then all you have to do is select which apps you’d like to use in BlueStacks and hit the Sync button up top.


Fig13: Sync Screen

On your computer, you’ll see a popup in your system tray when the apps have successfully installed.

 Fig14:Subsonic

Uninstalling Apps:

When you go back to the BlueStacks Channels website, you can click on the Cloud Connect link on the left to see which apps you have installed this way.

 Fig15:Subscribing Window

To uninstall an app, just click the Subscribed button. After a little while, the app will be uninstalled from BlueStacks and you’ll see a blue Subscribe button, in case you want to reinstall it.

Limitations:

As we mentioned before, BlueStacks is currently in the alpha stage of development. While it is surprisingly stable, there are some issues. For example, not all apps were able to have their orientations switched from landscape back to portrait, though we didn’t find it to be a particular disadvantage for when it happened. There are also some limitations present in the software.
You can’t browse the Android file system from Windows. This was particularly disheartening since I love Moon+ Reader for eBooks, and to get them on the device I had to use Dropbox and download them manually. Once I got them on there, I could navigate to where they would be in the Android system folders like normal and things worked fine.


Fig16:Dropbox Notification
 
Perhaps the biggest limitation is one placed on purpose: games. Not all games will play via the app. This seems to be because of an upcoming Pro version which allows unlimited use of “premium” apps.

 Fig17:Pro Version

One final drawback is that BackStacks seems to be using Android 2.2 FroYo as a basis for running these apps. While this doesn’t pose a big problem yet – most apps aren’t reliant on 2.3/Gingerbread yet – we hope to see this change, especially since Android 4.0/Ice Cream Sandwich is right around the corner.

Conclusions:

On the whole, the apps that did work by and large worked very well. Aside from a few hang-ups, BlueStacks seems like a very easy way to get Android apps working on your desktop, laptop, or even Windows tablet. Performance was smooth on our year-old netbook, a fact that was pleasantly surprising, and we can see how great this would be with a touch-screen. It’s not perfect, but it’s incredibly easy and very stable.

Friday, March 8, 2013

Concept Of Windows Page File


Windows system uses a page file to store data that can’t be held by your computer’s RAM when it fills up. While you can tweak the page file settings, Windows can manage the page file fine on its own.  We can see it as the cause of slowdown of tasks, because it is slower to use the page file than your computer’s RAM, but having a page file is better than not having one.

 Fig1: Page Files

How the Page File Works

The page file, also known as the swap file, page file, or paging file, is a file on your hard drive. It’s located at C:\pagefile.sys by default, but you won’t see it unless you tell Windows Explorer not to hide protected operating system files.

Fig2: Page File Location
  
Your computer stores files, programs, and other data you’re using in your RAM (random access memory) because it’s much faster to read from RAM than to read from a hard drive. For example, when you open Firefox, Firefox’s program files are read from your hard drive and placed into your RAM. The computer uses the copies in RAM rather than repeatedly reading the same files from your hard drive. Programs store the data they’re working with here. When you view a web page, the web page is downloaded and stored in your RAM. When you watch a YouTube video, the video is held in your RAM. 


Fig3: Hard Dive


When your RAM becomes full, Windows moves some of the data from your RAM back to your hard drive, placing it in the page file. This file is a form of virtual memory. While writing this data to your hard disk and reading it back later is much slower than using RAM. It’s back-up memory – rather than throwing potentially important data away or having programs crash, the data is stored on your hard drive.

Windows will try to move data you aren’t using to the page file. For example, if you’ve had a program minimized for a long time and it isn’t doing anything, its data may be moved to RAM. If you maximize the program later and notice that it takes a while to come back instead of instantly snapping to life, it’s being swapped back in from your page file. You’ll see your computer’s hard disk light blinking as this happens.

With enough RAM in modern computers, the average user’s computer shouldn’t normally use the page file in normal computer use. If you do see your hard drive start to grind away and programs start to slow down when you have a large amount open, that’s an indication that your computer is using the page file – you can speed things up by adding more RAM. You can also try freeing up memory — for example, by getting rid of useless programs running in the background.

Myth: Disabling the Page File Improves Performance

Some people will tell you that you should disable the page file to speed up your computer. The thinking goes like this: the page file is slower than RAM, and if you have enough RAM, Windows will use the page file when it should be using RAM, slowing down your computer. People have tested this theory and found that, while Windows can run without a page file if you have a large amount of RAM, there’s no performance benefit to disabling the page file. However, disabling the page file can result in some bad things. If programs start to use up all your available memory, they’ll start crashing instead of being swapped out of the RAM into your page file. This can also cause problems when running software that requires a large amount of memory, such as virtual machines. Some programs may even refuse to run.

Managing the Page File

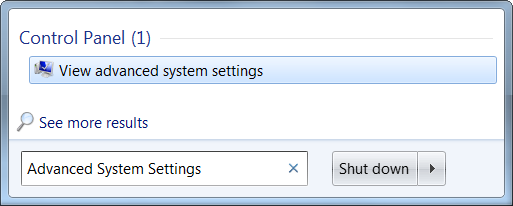
Windows automatically manages the page file’s settings for you. However, if you want to adjust your page file settings, you can do so from the Advanced System Settings window. Click Start -> type Advanced System Settings into the Start menu -> press Enter to open it.


Fig4: Advanced Setting Options


  Click the Settings button under performance. 


Fig5: System Properties


Click over to the advanced tab and click the Change button in the Virtual memory section.


Fig6: Performance Setting Options

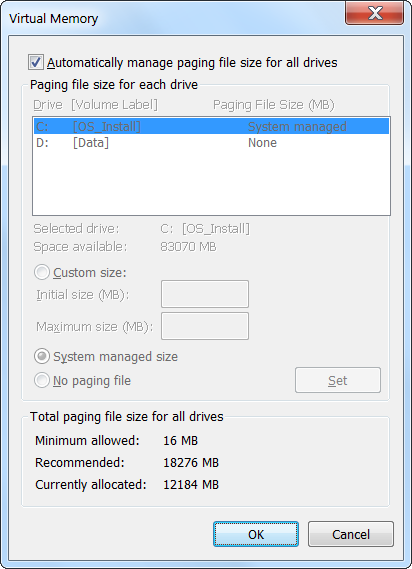
Windows automatically manages your page file settings by default. Most users should leave these settings alone and allow Windows to make the best decision for you.


Fig7: Virtual Memory Setting Options
 
However, one tweak that may help in some situations is moving the page file to another drive. If you have two separate hard drives in your computer, assuming one is the system drive with your programs installed on it and one is a less-used data drive, moving the page file to the data drive can potentially offer some increased performance when your page file is in-use. Assuming that Windows will already be using the system drive if it needs to use the page file, this spreads out the hard drive activity instead of concentrating it on one drive.