Open Source has
contributed with may of the applications that are useful to the
people and specially programmers. Geany is one of the applications
that is much used now a days. It is just like an IDE that enables a
user to run multi ingustic programs using one editor. It has an
inbuilt compiler which detects the type of code you are writing and
compiles the code. We will be seeing the basic code of C.
Showing posts with label php. Show all posts
Showing posts with label php. Show all posts
Wednesday, March 19, 2014


Thursday, February 13, 2014
Learn how to make simple login form (front-end) using HTML and PHP programming languages
Hi friends today we will see about how to make simple log in form using PHP, where there is no database connectivity is present.
Sunday, December 22, 2013
PHP: if, elseif, and switch case statement
Hi friends today we will see if statements, elseif
statement and switch case in PHP. First of all we will have a look
at if statement,
Tuesday, October 8, 2013
PHP: INCLUDE and REQUIRE command
Hi friends,
I am Jakir Patel and today in the series of PHP tutorials we will learn how to
include any file into some other file.
Just like C,C++ and JAVA which
includes many inbuilt header files in the program to enhance its usage and
reduce the size of actual program code; Similarly, we can also include previous
files into our current file to make repetitive code to be included easily.
Tuesday, October 1, 2013
INSTALL MULTIPLE SERVERS
Hello
Linux lovers, today I am going to discuss about Servers Installation.
Okay I am not going to show installation of every server that you
need in your life, for example apache server,DNS server,PHP server
etc. Instead of that I will show how to install all that servers in
your workstation. Mainly we need server on Linux Server but it might
be happens that you want to install those server on your Personal
Computer for your commercial or Non-commercial usage.
When
people start installation of server they don’t get any idea how to
install that server. They started searching on Google and they find
some commands to install it. But think is, when you want to install
more servers that time finding commands to install each server is
takes lots of time as well as you have to do more installations.
Instead of doing this all kind of lengthy stuffs, we have a great
command which make your installation so much easier than previous
tasks.
TASKSEL
is a command which helps you to install top 20 servers in your PC.
TASKSEL is by default installed in Ubuntu Servers, but we can install
it in your PC also by using command sudo apt-get install tasksel .
 |
| Fig:- Installing tasksel |
After
installing tasksel you can view it’s manual page also on terminal
by typing man tasksel. When you use tasksel command in terminal it
will show you all the top 20 server names. To install those servers
use space button to select your server, then click on OK button and
those servers that you have selected for installation they will start
installing in your system. This is a easier way to install servers on
your system, I hope it will help you.
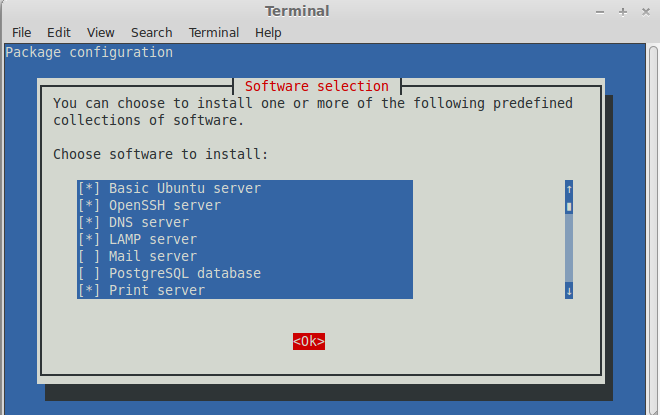 |
| Fig :- Installing Selected Servers |
Friday, September 27, 2013
PHP Part-2
Hi friends, this is my second blog on PHP and today we
will learn about:
- How to create and store variables?
- What echo do?
- How to give comment?
- What is heredoc?
Variable
form:
$variable_name=value;
This variable name is case
sensitive. There are some standard ways to write variable name:
1.
Name of the variable must start with
alphabetic word or “_”.
2.
Variable name must consist only of
alpha-numeric words and underscores.
3.
If there is more than one word in variable
then it must be separated by “_” or by capitalization.
Echo: Echo is used to
output the string. Echo uses quotes (“ “) to
define beginning and end of the string. At the time of echoing variable there
is no need for quotations.
Comment: Comments
are used to document the project or code.
For single line comments (//) are used
and for multiline comments (/*……….*/).
String: There are two types
of strings:
1.
Stored string: $my_string= ”Hey Jak”;
echo $my_string;
2.
Direct string: echo “ Hi Jak “;
Strings are quoted in two
ways, double quotes (“ ”) and single quotes(‘ ‘).
sHeredoc: This is the unique
feature of PHP, it lets programmer create multi-line strings without using
quotes. It begin with (<<<) and some identifier and it ends with
identifier followed by semi-colon (;).
Example:
example demonstrating use of variable, comment, echo and heredoc.

Monday, September 16, 2013
Introduction to PHP and its basic syntax
Hi friends, today we will see introduction to PHP and its basic
syntax. Prerequisite to understand this blog is to read my previous blog on
XAMPP server.
PHP
is the recursive acronym for PHP: Hypertext Pre-processor. PHP was developed by
Rasmus Lerdorf and now it is maintained by The PHP Group. It is an open source
server side scripting language. Pre-requisite for learning PHP is HTML. PHP
code can be embedded inside HTML code. PHP is mainly used for web development. Everything
in PHP is enclosed in angle brackets
“<?php ……………..?> “.
PHP allows writing
web pages which are dynamically generated. When a user visits any of the
website which has PHP webpage’s, then a web server processes the PHP code and
translate it into HTML page and then send to the requesting client.

PHP’s
syntax is very similar to C, Perl, Java beside this PHP code can also contains
tags.
PHP
code is:
<?php
------
------
?>
PHP
code must be saved with the .php extension. We will now see a simple Hello
World program written in PHP which will give us basic understanding about the
syntax of PHP that we must use.

This
simple code is saved in the xampp directory where the path is C:\xampp\htdocs\hello_world.php. We have
seen xampp in our previous blog, so start apache server there. And then go to
web browser and type localhost/Hello_World.php.
Output:

There
are several things to learn from this simple code written above. As we can see,
code which is red in colour is the starting and end point of php code.
Everything will be inside this code always. Now see line 2, echo is used to
print the statement that follows, be careful here to end the statement with
semicolon (;).
This
is the first blog on PHP and in coming weeks we will learn more about this
dynamic language.
Saturday, August 24, 2013
XAMPP: A web server package
XAMPP is a cross platform web server package. Cross platform means it works on every possible operating system without any compatibility issues. XAMPP is the acronym for: X-cross platform, A- Apache HTTP server, M- MySQL, P-PHP, P- Perl. The main advantage of XAMPP is that it requires very less configuration for its components, which make it quite user friendly. The default FTP user for XAMPP is "newuser", and default FTP password is "wampp". Similarly default MySQL user is "root", and there is no default password for MySQL.
.png) XAMPP contains its own XAMPP Control Panel, where all the modules and their current status is given. We can very easily start or stop any module which we want, by clicking on "Action" button beside modules. We can even configure the modules. A small pop-up screen appears when we click on "config" button.
XAMPP contains its own XAMPP Control Panel, where all the modules and their current status is given. We can very easily start or stop any module which we want, by clicking on "Action" button beside modules. We can even configure the modules. A small pop-up screen appears when we click on "config" button.
.png) There is one main config button on top right side. When we click on
that main config button on top right corner then the following window
will appear.
There is one main config button on top right side. When we click on
that main config button on top right corner then the following window
will appear.
.png) Below all this modules there is a terminal which displays the actions and generate a log file which we can view by clicking on logs. There are several different XAMPP distributions, 1. XAMPP for Linux, 2. XAMPP for Windows, 3. XAMPP for Mac OS X, 4. XAMPP for SOLARIS. Installing XAMPP is also very simple task in windows 8 just download the zip file and extract it and double click on .exe file. The folder name xampp will be created in C drive. So basically XAMPP is very user friendly and easy to use cross platform web server.
Below all this modules there is a terminal which displays the actions and generate a log file which we can view by clicking on logs. There are several different XAMPP distributions, 1. XAMPP for Linux, 2. XAMPP for Windows, 3. XAMPP for Mac OS X, 4. XAMPP for SOLARIS. Installing XAMPP is also very simple task in windows 8 just download the zip file and extract it and double click on .exe file. The folder name xampp will be created in C drive. So basically XAMPP is very user friendly and easy to use cross platform web server.
XAMPP is developed by Apache Friends and the Official website for XAMPP is www.apachefriends.org/en/xampp.html
.png)
.png)
.png)
XAMPP is developed by Apache Friends and the Official website for XAMPP is www.apachefriends.org/en/xampp.html
Subscribe to:
Posts (Atom)