Hello
geeks, I am back with new ideas and concepts. Today I would like to
share my own personal experience . While working on my college PC, one
of my friend asked me that Linux is faster for working but whenever
we start up our PC it's takes more time to boot up. Is any solution
for it? I too was facing the same thing. So I found the solution for
it. Linux takes time for booting just because it checks all the
services installed in our Operating System. In fact many time we
don't need all those services all the time, so better is to
disable those unnecessary services.
Showing posts with label apt-get. Show all posts
Showing posts with label apt-get. Show all posts
Tuesday, December 10, 2013


Tuesday, October 1, 2013
INSTALL MULTIPLE SERVERS
Hello
Linux lovers, today I am going to discuss about Servers Installation.
Okay I am not going to show installation of every server that you
need in your life, for example apache server,DNS server,PHP server
etc. Instead of that I will show how to install all that servers in
your workstation. Mainly we need server on Linux Server but it might
be happens that you want to install those server on your Personal
Computer for your commercial or Non-commercial usage.
When
people start installation of server they don’t get any idea how to
install that server. They started searching on Google and they find
some commands to install it. But think is, when you want to install
more servers that time finding commands to install each server is
takes lots of time as well as you have to do more installations.
Instead of doing this all kind of lengthy stuffs, we have a great
command which make your installation so much easier than previous
tasks.
TASKSEL
is a command which helps you to install top 20 servers in your PC.
TASKSEL is by default installed in Ubuntu Servers, but we can install
it in your PC also by using command sudo apt-get install tasksel .
 |
| Fig:- Installing tasksel |
After
installing tasksel you can view it’s manual page also on terminal
by typing man tasksel. When you use tasksel command in terminal it
will show you all the top 20 server names. To install those servers
use space button to select your server, then click on OK button and
those servers that you have selected for installation they will start
installing in your system. This is a easier way to install servers on
your system, I hope it will help you.
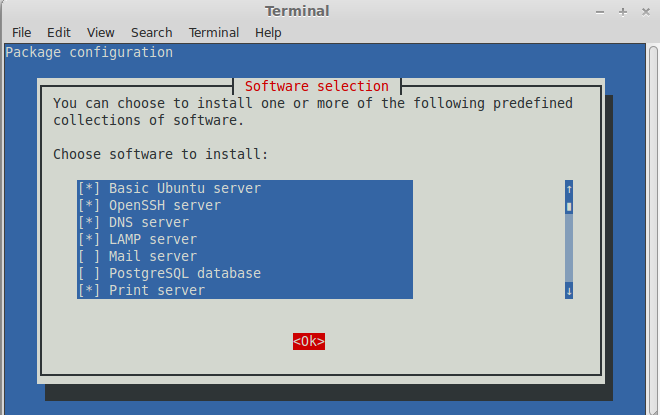 |
| Fig :- Installing Selected Servers |
Friday, July 26, 2013
OPENSSH-SERVER
SSH
is program to login into remote computer in Network. You can have all accessibility when you logged into remote computer. This is done by
Linux terminal. You can also login from Windows to Linux System but
you must have the Public key and password of the remote System, but for Linux you just need password of remote system. As I mention in the beginning of this blog SSH is a program from which you can login into
remote System. But it is must that Remote System must have
Openssh-server installed in its system.
You
can read more about SSH program by typing “man ssh” on your Linux
terminal, as shown below.
 |
| Fig :1 |
In
above image you can see at left most corner is given “SSH(1)”, that 1 means its “Executable programs or shell
commands”. In Linux there are different types of programs that run
on Linux Terminal. For example there is one command that is “kill()”
which can be use for two different purposes.
You
can check program type by typing on terminal “man man”, it shows following output on terminal as below.
 |
| Fig : 2 |
As
mention we must have Openssh-server on Remote system, following is an
example for installing Openssh-server in your system.
For
installing openssh-server:
sudo apt-get install openssh-server
 |
| Fig :3 |
You
can also download openssh-server(any package) instead of installing
it for later use.
For downloading openssh-server:
sudo
apt-get download openssh-server
 |
| Fig:4 |
Now,
to connect to remote System you have to type on your terminal,
ssh
-4 IP_Address_of_Remote_System
 |
| Fig:5 |
In
above command I used “-4”, which indicate that it's a IPV4, for
IPV6 use “-6”. When you'll try to login into Remote host, it will
ask for the Remote account password for security purpose. After
logged into Remote Host you can have all access to Remote host on your
terminal. But for Administrative or root access you must know it's password.
To access as Administrative or root you can switch to that account by typing
on terminal:
su
account_name
It will ask you the password for the same account. After entering into that account you can have access as Admin or root.
Many times it happened that you login as Admin but you can't use some commands like poweroff . So for that purpose just try following command,
sudo
poweroff
Here, it will ask for the Admin Account password, type it and then you can use
some of the root command easily.
Wednesday, July 3, 2013
How to Tweet from Linux Terminal
Twitter is a great social networking
site and many of us has being addicted to it. But as on twitter we mostly do
tweeting which is a text part so why not we tweet while we're working in the
Linux terminal .It's quite of fun.
You can do this with Twidge. Twidge is
a terminal client for microblogging sites such as Twitter. Twidge is a simple
Twitter client for the Linux command line. There are also some other command
line Twitter clients, but Twidge is simple and easy to install.
Twidge is available in the 11.10
repositories so if you are using 11.10 version then simply installs it by the
following command:-
sudo apt-get install twidge
Or you can download it from Ubuntu
software centre.

Fig: 1
But if you are using any other version
of Ubuntu, you need to manually add the repositories for Twidge.
Do the following commands:-
sudo gedit /etc/apt/source.list
Append the following line at the end
of the text
deb http://ftp.de.debian.org/debian
squeeze main
Save this repository to your source.list
to be able to download Twidge. Then you can install it from the command line.
Run the following commands:-
sudo apt-get update
sudo apt-get install twidge
Now after installing Twidge, you have
to do the set up of Twidge. You can do this by the following command:-
twidge setup

Fig: 2
As shown in above fig, Twidge setup will
generate an URL for the authentication. Copy that URL and paste it in your
browser, then it will ask you for your login stuffs, just login and it will
generate an authentication code. Now you have to just enter the generated
authentication code in your terminal and enter and then you are done. After
that you can get ready to tweet.
To update your status you can run the
following command:-
twidge update
And then type your status. The status
should be of 140 characters limit that much Twidge allows.
You can check your replies by the
following command:-
twidge lsreplies
You can check the recent updates by
the following command:-
twidge lsrecent
There are many other commands for
follow, unfollow. For that you can check into man pages by following command
man twidge
Or, you can use lscommands to see the
full list of commands at a glance.
twidge lscommands.
Have fun with the new style of
updating your twitter.
Thursday, January 3, 2013
APTonCD – Create Backup of Any Installed Packages in Ubuntu
The most common method
that is used to carry out installation of any sort of additional packages in
Ubuntu is the apt-get. The apt-get
following the name of the software package you specified to install, it
searches for that particular software from the Internet and if found, apt-get
downloads and installs it on your system. But there is a tool which allows you
to install the download packages on your system without downloading. The tool
named, APTonCd, which is a graphical
tool that allows you to create one or more CDs or DVDs of all the packages that
you’ve downloaded via apt-get and thus creates a removal repository that you
can use on other computers with a single action. The main advantage of APTonCD
is that you don’t have to download the packages again if you are doing a fresh
installation on your or other systems. You can restore the previously installed
programs easily. Let’s see how we can do this in Ubuntu.
Installation:First you have to install APTonCD.
You can install APTonCD from the Ubuntu Software Center.

Or you can install it
through your terminal. Run the following command:
sudo apt-get install aptoncd
 Fig2.Install
APTonCD through terminal
Fig2.Install
APTonCD through terminal Fig3.Launch
APTonCD from Dash
Fig3.Launch
APTonCD from Dash
Backing
up Packages:
After you launch it, you
can see the following window. Click “Create” button to create a disc with your
downloaded, cached deb packages on it. This copies packages from your APT cache
located in the /var/cache/apt/archives/directory to the disc.

Fig4.Starting
screen to Create the backup.
Next step is to select the
packages which you would like to write to the disk. By default it selects all
the packages but you can deselect them if you don’t want those packages to be
written on the disc. And also you can add some additional packages you want by
clicking the Add button.

After you get a Window
that allows you to select a CD or DVD image, give it a name and the location
for the ISO image file, and select optionally create a meta-package.
 Fig6.Specifying the installation disc properties.

Fig8.Scanning the packages.
Once the image is created,
you can have APTonCD launch a disc-burning application, Such as Brasero, to
burn it to a disc immediately. You can burn the ISO image later also. And if
you don’t have a disc drive, then there is nothing to worry, you can also save
the ISO image as a file and you can transport it using a USB drive between
computers.

Installing
All Packages:
If you burnt the image to
disc, you can insert it into your drive by opening it in a file manager window,
and double-click the package named ”aptoncd-metapackage” to install it. This
will install all packages available on the disc. The package will not be
present if you didn’t have APTonCD create a meta-package.
If you have not burn into
a disc and you have just an ISO image then you can mount it as a disc and
install the packages from it.
Adding
a Disc as a Repository:
The File -> Add CD/DVD
option in APTonCD adds the disc to APT as a software source. The disc will be
used as a repository in APT, so you can install packages from it using
Synaptic, apt-get, or any other package management tools, even if you’re
offline.

Fig11.Adding
CD or DVD as APT source.
Restoring
Packages to Cache:
Before you click on the
Load Button on the restore screen, you have to install the hal package on your
system. To do so, run the following command:
sudo apt-get install hal

Fig12.Installing
the hal packages.
Restart APTonCD after
running this command and you’ll be able to restore packages by Restore button.
You can restore packages to any of your system.
 Fig13.Load
the packages.
Fig13.Load
the packages.
Use the Load button on the
Restore screen to specify a disc drive or ISO image file.

Fig14.Selecting
an ISO image.
Subscribe to:
Posts (Atom)