Hello
Linux geeks, today I would like to share one trick with you that will
always help you out when you need root access but you don't have it's
password. Here I am considering that you know basic stuffs about
root, administrator and normal user access/permissions. To get root
access you know at least the administrator password, because this is
not a hacking it's a ethical trick. So just follow the following
basic steps to gain root access.
Showing posts with label permissions. Show all posts
Showing posts with label permissions. Show all posts
Friday, February 28, 2014


Sunday, June 30, 2013
XPrivacy - Xposed Framework Module
About XPrivacy
In
earlier post, I had explained about Xposed Installer and OpenPDroid. The
former explaining about modifying your ROM without modifying an APK or flashing
a custom ROM, and the latter explaining about protecting your privacy and
providing fake or null information to the apps that access your private data.
Now, today I'm going to explain about a
combination of both Xposed and OpenPDroid. Yeah, enter XPrivacy module for
Xposed Framework. Wondering what is it?
I am going to explain about it in a
minute, read on..!!
XPrivacy can be used as an alternative to
OpenPDroid, though not as restrictive as OpenPDroid can be, but still is a
great option for those who cannot patch their ROM to run OpenPDroid. XPrivacy
can be used to prevent applications from accessing your private sensitive data.
XPrivacy does this by providing an
application with null or fake data.
XPrivacy does not block the permissions of
an application, it just provides the application with fake data, hence there'll
be no problem of a particular application getting force closed because of using
XPrivacy.
If providing fake or null data to an
application causes problems in working of an application, then the same can be
reversed. By default, all newly-installed applications will not be allowed to
access any data, so that any new application cannot leak any sensitive data
after its installation. After every application installation, XPrivacy will
prompt to ask for the data you want the application to have access to.
As the developer of the XPrivacy module
says, XPrivacy will monitor attempts made by all applications to access
sensitive data. XPrivacy will highlight (with a yellow triangle) a data
category for an application (or an application name in the application browser)
as soon as data of the data category has been used. XPrivacy will also display
if an application has internet access, indicating that the application poses a
risk of sharing the data it obtains with an external server. If an application
has requested Android permissions to access data in a data category, it will
also be displayed (with a green tick), but this will only be shown when looking
at an individual application, since checking permissions for all applications
is quite slow.
XPrivacy is built
using the Xposed framework. XPrivacy taps into a number of selected functions
of Android through the Xposed framework. Depending on the function, XPrivacy
conditionally skips execution of the original function (for example when an
application tries to set a proximity alert) or alters the result of the
original function (for example to return empty calendar data).
Installation of
XPrivacy
1. Requires Android Jelly Bean (4.1 and
above) and rooted phone.
2. Requires Xposed Framework installed.
4. Enable XPrivacy in Xposed Installer >
Modules tab.
5. Reboot into Recovery mode.
6. Flash Xposed fix for the version of
Android.
7. Reboot your phone.
If you have any queries, feel free to
comment.!!
Saturday, June 15, 2013
OpenPDroid – Protect your Privacy in an Android Phone
Whenever we
download an application from the Android Play Store, it shows us the
permissions the applications uses. Many applications access our data like,
location, usage statistics, contacts, messages, phone numbers. Even if we don't
want to share a particular data with the application due to privacy concerns,
the only way not to share data is to uninstall the application. We can also
provide fake data to the application. But HOW?
OpenPDroid helps protect
your privacy by providing real, fake, null or random data based on our
preferences. We can configure OpenPDroid for each and every application
installed on our device, so we can configure what data to share with various
applications. For example, if we have set our preference as to provide location
as 'Mumbai' for Facebook app, then even if we are in USA, Facebook will only
get location as 'Mumbai'. Fascinating, isn't it?
 |
| PDroid Manager Application |
Description of
OpenPDroid from the developer:
“OpenPDroid
is a set of modifications to the Android framework and libraries which allows
fine-tuning of the data which applications are able to retrieve about your
device, your account, your messages, and more.”
“OpenPDroid intervenes in API interactions by apps (e.g. when an app
attempts to retrieve your location, phone number, or contacts) and provides
real data, empty data, fake data or random data, depending on the user
setting.”
As OpenPDroid just
modifies the data requested by the app without modifying the permissions of the
app, there is very less chance of getting undesired effects like Force Close of
app, etc. OpenPDroid supports Android versions 4.1.2 and 4.2.1, and is also
completely open-source.
 |
| Permissions of Google Chrome |
This actually needs
modification of Android framework and hence is hard to implement on a
particular Android OS you already have, and is not as easy as installing an
app. This mod should be added to Android ROM when the ROM is compiled from
source. There also is a tool named auto-patcher for implementing the mod in an
existing ROM. The tool is available for Windows, Linux and Mac OS X.
Though implementing
OpenPDroid requires much effort, it is well worth, if you are concerned about
your privacy from the big list of permissions required by various apps you use.
For more information, you can refer to: OpenPDroid
Thursday, February 21, 2013
Move up Your Text SMS to Your Gmail Account
Backing up your text messages from your
Android phone to your Gmail account is so simple there’s no reason to not back
them up and make them search-friendly in the process. Read on to see how you
can turn your Gmail account into an SMS vault.

Fig1: Gmail with
Android
Prerequisites:
It’s easy to lose your text messages. Backing
up your SMS messages to your Gmail account is so simple, however, there’s no
good reason not to do it. For this tutorial you’ll need three things:
- Your Android phone
- A free copy of SMS Backup+
- A Gmail account
Configuring Your Gmail Account for IMAP Access:
SMS Backup+ requires IMAP access to your Gmail account to function. Let’s take a moment and hop over to the Gmail account we’re planning on using with the application and check the status.

Fig2: IMAP and POP label
Login to your Gmail account and navigate
to Settings –> Forwarding and
POP/IMAP. Check Enable IMAP. Scroll down
and click Save Changes. That’s the only configuration
you’ll need to do within your Gmail account.
Installing and Configuring SMS Backup+:

Fig3: Installing SMS Backup+
With our Gmail account IMAP features
toggled on, it’s time to install SMS Backup+. Hit up the Google Play Store and
download the app. After the application is installed, it’s time to get
configuring. Launch the application. The first screen you’ll see will look like
the following:

Fig4: Launch Screen
The first step is to set up the connection to your Gmail account. Tap Connect. The default browser on your Android phone will launch and you’ll be prompted to login to the Gmail account you want to use for backing up your messages. After you login you’ll need to authorize SMS Backup+ to utilize your Google account like so:

Fig5:Google Permission Screen
The first step is to set up the connection to your Gmail account. Tap Connect. The default browser on your Android phone will launch and you’ll be prompted to login to the Gmail account you want to use for backing up your messages. After you login you’ll need to authorize SMS Backup+ to utilize your Google account like so:
 Click Grant Access. You’ll be
prompted to begin a backup immediately or skip the initial backup:
Click Grant Access. You’ll be
prompted to begin a backup immediately or skip the initial backup:
 Fig6:Backup option Screen
Click Grant Access. You’ll be
prompted to begin a backup immediately or skip the initial backup:
Fig6:Backup option Screen
Click Backup,we
didn’t come all this way not to back things up! If you hit Skip then all the
messages on your phone will be flagged as already backed up and will be
ignored.
The backup process will start, and
depending on how many messages you have, will take anywhere from a minute to a
half hour to complete. It clips along at about a message per second:

Fig7: Back-up Progress Screen
You don’t even have to wait until the
process is finished to jump over to the Gmail account and check the progress.
Login to your Gmail account from a web browser. You’ll see a new label in the
sidebar, SMS. Click on it:

Fig8: Gmail Inbox
Screen
Cool…! SMS Backup+ automatically backs up
your SMS messages as well as your MMS messages. Not only are all of our text
messages there but the pictures we’ve sent back and forth are backup up to
Gmail along with the messages. Now that we’ve got everything humming along,
let’s look at some advanced options.
From the main screen tap Auto
backup to turn it on and then tape on Auto
backup settings to configure the frequency. The default
configuration is a bit aggressive. You may wish to, as we did, decrease the
frequency of backups and even set it to only backup one Wi-Fi if you’re backing
up a lot of MMS and don’t want to burn through your mobile data quota.
After you’ve set up the automatic backup,
return to the main screen and head into advanced settings. There
you can change the settings for backing up, restoring, and notifications. Under
Backup there are some useful settings you may
wish to toggle include turning off MMS backup (again, to save on data
consumption, and creating a white list of contacts you want backed up (instead
of the default where every single message is backed up).
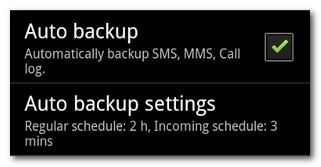
Fig9:Gmail Inbox Screen
There isn’t much to look at under the Restore
settings, but you can take advantage of a handy Gmail-centric trick. When SMS
Backup+ stores your messages in Gmail it creates a thread for each contact. You
can tell SMS Backup+ to only restore the contacts with starred threads which
allows you to quickly select which conversations are important enough to
restore via the star system in Gmail.
So there you have it! All your text
messages (including multimedia attachments) are backed up within Gmail where
you can easily search them and restore them to your handset should the need
arise.
Subscribe to:
Posts (Atom)