Friday, September 27, 2013

PHP Part-2

Hi friends, this is my second blog on PHP and today we will learn about:
  • How to create and store variables?
  • What echo do?
  •  How to give comment?
  • What is heredoc?
Variable: By using variables we can store strings, a word or a number. In PHP, data types are assigned automatically. There is no need to assign data types manually.   
Variable form:
          $variable_name=value;
This variable name is case sensitive. There are some standard ways to write variable name:
1.     Name of the variable must start with alphabetic word or “_”.
2.     Variable name must consist only of alpha-numeric words and underscores.
3.     If there is more than one word in variable then it must be separated by “_” or by capitalization.

    Echo: Echo is used to output the string. Echo uses quotes (“ “) to define beginning and end of the string. At the time of echoing variable there is no need for quotations.

    Comment: Comments are used to document the project or code.
For single line comments (//) are used and for multiline comments (/*……….*/).

 String: There are two types of strings:
1.     Stored string: $my_string= ”Hey Jak”;
echo $my_string;
2.     Direct string: echo “ Hi Jak “;
Strings are quoted in two ways, double quotes (“ ”) and single quotes(‘ ‘).
 sHeredoc: This is the unique feature of PHP, it lets programmer create multi-line strings without using quotes. It begin with (<<<) and some identifier and it ends with identifier followed by semi-colon (;).

 Example: example demonstrating use of variable, comment, echo and heredoc.


Facts about Google


Who invented Google?


                      Larry Page


                               Sergey Brin


Inventors of google was were Larry Page and Sergey Brin. Both of them met at a university at Stanford University in 1995. They built a Search Engine was pre-named as "BackRub".That Search Engine basically use to determine the links of individual webpages.


Where does this google name come from ?


 Larry and Sergey named the search engine they built “Google,” a play on the word “googol,” the mathematical term for a 1 followed by 100 zeros. Google Inc. was born in 1998, when Sun co-founder Andy Bechtolsheim wrote a check for $100,000 to that entity—which until then didn’t exist.

Then Advertisements Initialization


                 In 2000 google introducted self-service program for creating user's marketable ads and campaings. They include Display,mobile and video ads as well as simple text.Which Helped Advertisors and publishers at high-end which great profits.


When did google started with gmail ?


                 In 2004 on 1st of april google launched Gmail.Provided fast and easy GUI for sending and receiving mails.

Why people prefer Gmail more then other mails?

                 Security level is high
                 Gmail has a sense of adjustment of user-end speed of internet.So at present when you will open there mail webpage and if your speed is low then there is an alternative option to load simple html page or there upgraded gmail page.

Another Service and Many of you know


Google maps


                 Google then with more advancement hiered a digital mapping company "Keyhole" in 2004 and then launched google maps and google earth in 2005.

Today's Feature for google maps:
1.Live traffic.
2.transit directions.
3.Street-Level Imagery.
4.Exploring Oceans and moon.

So When google started with "youTube" ??


                 In 2006 google acquired online video sharing site youtube.

Records :

Today 60hours of video are uploaded to the site every minute.

                 People through out the world are accessing this webpage and have millions and billions of view per day.

Google Play free source for Android app


                 Amidst rumors of a “Gphone,” google announced Android—an open platform for mobile devices—and the Open Handset Alliance, in 2007.


When did Google launched "google+" ?

                 In June 2011, google introduced the Google+ project, aimed at bringing the nuance and richness of real-life sharing to the web, and making all of Google better by including people, their relationships and their interests.


Monday, September 23, 2013

MEMWATCH: A Memory Debugging Tool


We can say that C language is one of the most standard programming language on Linux systems as this language provides a great deal of control over dynamic memory allocation. So C language provides a lot of freedom to control your program as you wish. But this can cause memory management problems and also this can degrade our program. We use malloc() function to allocate memory but forget to released that memory with corresponding free() call which can cause Memory leaks which is one of the memory management problem. Buffer overruns i.e. writing on the previous memory locations that has already been allocated for an array can also be the problem. These problems are difficult to detect.

So there is as memory debugging tool known as MEMWATCH which is an open source memory error detection tool for C. MEMWATCH is a user level memory debugging tool. This tool has been written by Johan Lindh. You can download MEMWATCH from here.

Now how to use it? When you write the C code just simply add the header file to your code and by defining it in the gcc statement , we can track the memory leaks in our program. It will provides a log of results and detects the unfreed memory, overflow, underflow etc.

Here is program sample memory.c :

#include <stdlib.h>
#include <stdio.h>
#include "memwatch.h"

int main()
{
  char *ptr1;
  char *ptr2;

  ptr1 = malloc(320);
  ptr2 = malloc(320);

  ptr2 = ptr1;
  free(ptr2);
  free(ptr1);
}
In above code, we can see that first 320 byte blocks of memory is allocated then the pointer to the first block is set to the second block, so the address of the second block is lost which cause memory leaks.

Now compile the code:
 
  gcc -DMEMWATCH -DMW_STDIO memory.c memwatch c -o memory

After that when we run the program, MEMWATCH reproduces a report of leaked memory.

     ./memory


 You can also see the memwatch.log file.


Friday, September 20, 2013

Reset BIOS Supervisor Password

Many times it happens that our computer vendor often lock our computer BIOS with Supervisor Password. So, if we ever need to change boot device settings or any other settings in our BIOS then we have to go to the service center to do it. Here, I will show you how to bypass the Supervisor Password and reset it.

How To:

  1. Switch On the Laptop.
> Go to BIOS Setup on startup. The BIOS will request for Supervisor password. Enter anything, for 3 times, and then the system will display a System Disabled message.
Enter Wrong Password
Ignore Warning


  1. System Disabled Code.
> Write down the code displayed below the System Disabled message. You need to generate the BIOS backdoor password.

Note down this code


  1. Backdoor Password Generation.
> On a computer with Internet connection, go here and enter the code, you got in previous step. This site will generate a backdoor password for you.
Go to the link provided


  1. Restart Computer.
> Again go to BIOS Setup screen, again it will ask for Supervisor password, now enter the Backdoor password that you got from the website. There you go, you just unlocked your BIOS. 
Enter the password you got from website
 

  1. Change Password.
> Now go to Security tab in the BIOS, and change Supervisor password to whatever you want or keep it blank. Whenever it asks for old password, type in the Backdoor password.
Now change the password

It is as simple as that..!!

Wednesday, September 18, 2013

Trapping Signals of Terminal in Linux


It frequently happens that while programming either by designing or by accidently the control falls in an indefinite loop. There has to be a way of getting out of such indefinite loops. This facility is provided by the programming environment. Generally we use Ctrl + C to end a process, but this can be trapped using a UNIX shell command “trap”. There are signal numbers for various signals as shown in table below:
 
Table 1. Signals In Unix
We can see a basic shell code which is used to trap the signals 1, 2, 3 (from Table 1).
Example:
trap "" 1 2 3
figlet terminal
figlet locked
                      while true
                      do
                                  echo "Enter Password:"
                                  stty -echo
                                  read password
                                  stty sane
                                  if [ "$password" = "dinesh" ]
                                  then
                                          break
                                  else
                                 echo "Wrong Password, Please Enter Again: "
                                 fi
                      done
OUTPUT:
Figure 1. Output
In the above program we can see various commands such as,
1. figlet: Display large characters made up of ordinary screen characters.
2. stty: Change and print terminal line settings.
For more information about the commands use the manual pages.


Tuesday, September 17, 2013

ADODC connectivity

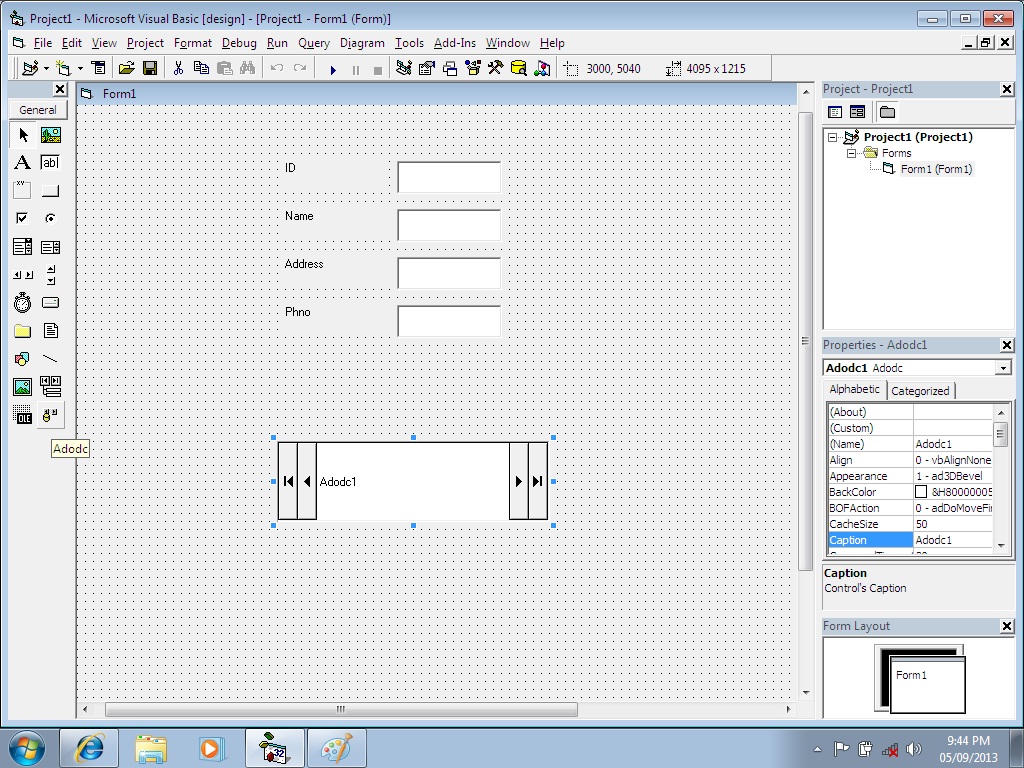
Hello friends, in this blog we are going to study how to connect Oracle database with Microsoft’s Visual Basic. To do it we must have installed Oracle and Visual Basic (VB). If it is not installed then please get it install. Now to connect VB with Oracle, Oracle must contain at least one table. Further process is explained step by step: Design form in VB as shown in figure, form must contain one text box box for each field in table in Oracle.
  • Design form in VB as shown in figure, form must contain one text box box for each field in table in Oracle.
  • You have to add component in VB: right clicking on toolbox select option component, it will display new window containing three fields. From these three fields select “Controls” and from them select component named “Microsoft ADO data control(OLEDB)” then apply it then click on OK as shown in figure 1. It will add new component in tool box.
Figure1.Adding ADODC component
  • Click on this control and put it on form as shown in figure 2.

Figure2. Form design and ADODC control
  • Now open control panel from start button select administrative tool, it will display list from them select “Data source (ODBC)”. It will display ODBC data source administrator window shown in figure 3.
    Figure 3. Creating Data source
    • From that click on add button it will display new window for creating new data source.
    • From that select your database which is installed previously that is Oracle. I have installed Oracle XE that’s why I am selecting it as shown in figure 3.
    • After that it will display configuration window where you can specify data source name and you can test connection by clicking on test button. For testing connection it will ask for service name, user name and password which is of we have set to oracle. And after that click on OK button it will display message “connection successful” as shown in figure 4.
      Figure 4 Configuring data source
     
  • Now come to VB right click on ADODC control and select properties, it will display new window. From that window select second option “Use ODBC data source name” from general tab. From that select data source name which is created previously from administrative tool as shown in figure 5.
  • Now click on second tab “Authentication” in that enters user name and password provided to Oracle as shown in figure 5.
  • Now come to third tab “Record source”, in that enter query which you want to perform. I am entering select as shown in figure, and then click on apply and then OK as shown in figure 5.
    Figure 5 ADODC component property
     
  • Now click on text box and go to property and click on Data source as ADODC which is already there and Data field which data you want to display in that text box. Do this for all text box as shown in figure 6.
    Figure 6 Property window of text box
    Now you can run your project. It will by default display first record from table in text boxes. You can see next, previous record by clicking on ADODC control next and previous button as shown in figure 7.
    Figure7.Run project

Monday, September 16, 2013

Introduction to PHP and its basic syntax

Hi friends, today we will see introduction to PHP and its basic syntax. Prerequisite to understand this blog is to read my previous blog on XAMPP server.
PHP is the recursive acronym for PHP: Hypertext Pre-processor. PHP was developed by Rasmus Lerdorf and now it is maintained by The PHP Group. It is an open source server side scripting language. Pre-requisite for learning PHP is HTML. PHP code can be embedded inside HTML code. PHP is mainly used for web development. Everything in PHP is enclosed in angle brackets
“<?php ……………..?> “.
PHP allows writing web pages which are dynamically generated. When a user visits any of the website which has PHP webpage’s, then a web server processes the PHP code and translate it into HTML page and then send to the requesting client.
PHP’s syntax is very similar to C, Perl, Java beside this PHP code can also contains tags.
PHP code is:
<?php
------
------
?>
PHP code must be saved with the .php extension. We will now see a simple Hello World program written in PHP which will give us basic understanding about the syntax of PHP that we must use.
This simple code is saved in the xampp directory where the path is C:\xampp\htdocs\hello_world.php. We have seen xampp in our previous blog, so start apache server there. And then go to web browser and type localhost/Hello_World.php.
Output:
There are several things to learn from this simple code written above. As we can see, code which is red in colour is the starting and end point of php code. Everything will be inside this code always. Now see line 2, echo is used to print the statement that follows, be careful here to end the statement with semicolon (;).
This is the first blog on PHP and in coming weeks we will learn more about this dynamic language.