Showing posts with label security. Show all posts

Saturday, June 15, 2013

OpenPDroid – Protect your Privacy in an Android Phone

Whenever we download an application from the Android Play Store, it shows us the permissions the applications uses. Many applications access our data like, location, usage statistics, contacts, messages, phone numbers. Even if we don't want to share a particular data with the application due to privacy concerns, the only way not to share data is to uninstall the application. We can also provide fake data to the application. But HOW?
         
OpenPDroid helps protect your privacy by providing real, fake, null or random data based on our preferences. We can configure OpenPDroid for each and every application installed on our device, so we can configure what data to share with various applications. For example, if we have set our preference as to provide location as 'Mumbai' for Facebook app, then even if we are in USA, Facebook will only get location as 'Mumbai'. Fascinating, isn't it?

PDroid Manager Application Interface
PDroid Manager Application
         
         
Description of OpenPDroid from the developer:

OpenPDroid is a set of modifications to the Android framework and libraries which allows fine-tuning of the data which applications are able to retrieve about your device, your account, your messages, and more.

“OpenPDroid intervenes in API interactions by apps (e.g. when an app attempts to retrieve your location, phone number, or contacts) and provides real data, empty data, fake data or random data, depending on the user setting.”

As OpenPDroid just modifies the data requested by the app without modifying the permissions of the app, there is very less chance of getting undesired effects like Force Close of app, etc. OpenPDroid supports Android versions 4.1.2 and 4.2.1, and is also completely open-source.

Permissions of Google Chrome on Android
Permissions of Google Chrome

         
This actually needs modification of Android framework and hence is hard to implement on a particular Android OS you already have, and is not as easy as installing an app. This mod should be added to Android ROM when the ROM is compiled from source. There also is a tool named auto-patcher for implementing the mod in an existing ROM. The tool is available for Windows, Linux and Mac OS X.
         
Though implementing OpenPDroid requires much effort, it is well worth, if you are concerned about your privacy from the big list of permissions required by various apps you use.

For more information, you can refer to: OpenPDroid

Thursday, February 14, 2013

AppArmor in Ubuntu

AppArmor is the most important security feature in Ubuntu which has been included since Ubuntu 7.10. We are not aware of this security feature because it’s a background process. As it is runs in the background silently we couldn’t identify what it is and what it’s doing.
AppArmor:-
AppArmor locks down vulnerable processes and restrict the damage that vulnerable process can cause thus providing a good security. AppArmor is similar to SELinux which is included by default in Fedora and RedHat. Both provide “mandatory access control” security. But AppArmor also allows Ubuntu’s developers to restrict the actions, processes can take.
For example, one application that is restricted in Ubuntu’s default configuration is the Evince PDF viewer. When Evince runs as a user account, it can only take specific actions. Evince only has the permission to run the PDF documents. If Evince discovered and opened a malicious document, AppArmor would protect the damage that Evince could do. So AppArmor gives the particular actions to be run by the applications or the process that user can access for restricting the exploitation of the software.
Viewing AppArmor’s Status:-
 We can view the AppArmor’s status by running the following command:
           sudo apparmor_status

We can see the AppArmor profiles that are installed, the confined and enforced process that are running.
AppArmor Profiles:-
In AppArmor, the restriction put in the processes are done by the profiles. We can see the list in the AppArmor status, the profiles that are installed on the system which comes with Ubuntu. You can also install other profiles by installing the apparmor-profiles package. You also can create your own AppArmor profiles to restrict the software.
As we saw in the status, that profiles run in the “complain mode” or “enforce mode”. In enforce mode, the default setting for the profiles that come with the Ubuntu - AppArmor prevents the applications from taking restricted actions. In complain mode it does the same and also it creates a log entry complaining about this. Complain mode is ideal for testing the AppArmor before enabling it in enforce mode so that we can see the error’s that would occur in the enforce mode.
Profiles are stored in the /etc/apparmor.d directory. These profiles are plain-text files that can contain comments.
You can also lock down the Mozilla FireFox for the increased security, but it doesn’t do this by default. The /etc/apparmor.d/disable folder contains a link that shows it’s disabled. You can see the Firefox profile i.e. usr.bin.firefox in the /etc/apparmor.d directory.
To enable it and confine Firefox profile with AppArmor, run the following commands:
        sudo rm /etc/apparmor.d/disable/usr.bin.firefox
        cat /etc/apparmor.d/usr.bin.firefox | sudo apparmor_parser –a
After you run these commands, run the sudo apparmor_status command again, and now we will see that the Firefox profiles are also added.
We can also disable this Firefox profile, run the following commands:
       sudo ls -s /etc/apparmor.d/ usr.bin.firefox /etc/apparmor.d/disable/
       sudo apparmor_parser –R /etc/apparmor.d/ usr.bin.firefox

Thursday, January 31, 2013

ENCRYPT YOUR IMPORTANT FILES BEFORE SYNCING TO THE CLOUD

As we all know how cloud storage services have become an integrated part of our everyday computer use. Cloud storage gives us flexibility to store our data and to access them from anywhere in the world and also gives many other advantages too. But the main concern raises over here is the security of the data. We always wish that our data must be secured and does not get changed or hacked by others, as we all know how important our data is. So this can be deal with using the Secured Cloud Drive, which encrypts the files using military-grade 256-bit AES encryption prior to sending them your selected cloud drive. This will make your data unreadable to others. It supports almost all your cloud storage services like SkyDrive, Dropbox etc.

Secured Cloud Drive lets you synchronize a shared folder on your computer with the exchange folder on your cloud. The files will be encrypted with the 256-bit encryption layer, so that no one can have access to your files except you. So for this, the software of Secured Cloud Drive is required to download. You can do this by clicking the following link http://www.secured-cloud-drive.com/download/. Once installed, now you have to follow some of the configuration steps that show how the service works.

Select Next and Next option to proceed and in the fifth step you can see the Select Folder option. This option let’s you allow to give the path where your folder is present that you want to share and then click to next to proceed.
Similarly in the sixth step, the application will ask you for your exchange folder. This folder should be present on your cloud drive.
Next you have to specify a password for the encrypted files. The application uses the same password when you download your files to your computer.
Secured Cloud Drive uses a license code for each shared folder. You get a single license for free, but additional licenses have to be purchased for sharing more than one folder. As you receive the license code, enter it to the application and click Next to proceed.
 

Now all you need to do is to store files on the shared folder and they will get automatically encrypted and synced to the exchange folder. This application creates a foldername.exchange directory on the cloud to which the encrypted files are actually moved.
                                                         
The additional folders can be shared by clicking ‘New share’ from the application’s right-click context menu in the system tray. You have also many other options to select such as pause synchronization, exit etc.
                         
This application will keep all your important files safe on your cloud drive.

Friday, January 11, 2013

APPLOCKER POLICY


What is AppLocker ?

Windows 7 AppLocker is one of Windows 7 tool improving security of Windows users. Using Windows 7 AppLocker feature, Windows users can specify the software that are allowed to run or disallowed to run on a Windows user's PC. Windows administrators can also control AppLocker features and manage applications using flexible Group Policies. So friends,If you have Microsoft Windows 7 Ultimate edition or Windows 7 Enterprise edition installed on your computer then you have Windows 7 AppLocker tool ready for use. Windows AppLocker enables Windows users to control the execution of specific software applications and programs under certain Windows user privileges. Especially for parents, Windows 7 AppLocker is a very handy tool to prevent selected programs to be run by children. For example, parents can disallow a PC game rated as including violence for their children to play.

Rules for creation of the Applocker :

Windows 7 users can start Win7 AppLocker following the below selections :-
Control Panel > System and Security > Administrative Tools.

 
                                            Fig1. Local Security Policy Window
Double click on Local Security Policy among Administrative tools.Windows 7 users can see the AppLocker node under the Application Control Policies node.

                                             Fig2.Application Control Policies node

Click on Executable Rules node.If you have not yet created any rule for a software application, this section will be empty.

If you wish to create rule try this :

Right click on the Executable Rules node or right click on the empty space on the right pane.
Select Create New Rule from the displayed context menu.


                                                     Fig3. Context Menu

Proceed to following step in Windows 7 AppLocker wizard with Next button.
 
                                                                 Fig4.Wizard Screen
The permissions screen will be displayed.

In this screen administrators can define if the AppLocker rule will be an Allow action or a Deny action. Also Windows administrators will also identify the Windows users or User groups to be affected by this rule.
 
                                                         Fig5.Permission Screen
Continue with Next for following Windows 7 AppLocker screen where admins will define the Conditions for the AppLocker rule. As seen in the below screen-shot, Windows 7 AppLocker rules can be set according to path of the executable information.

                                                      Fig6. Condition Screen
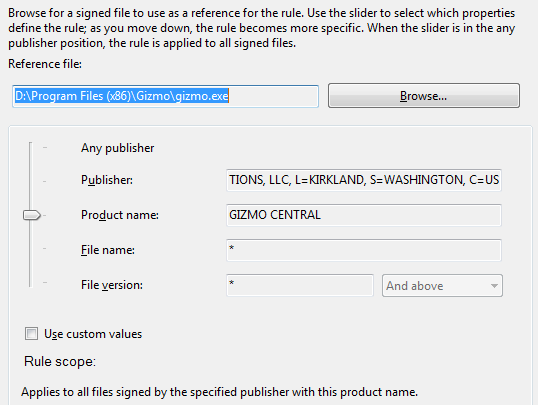
In the Publisher definition screen, choose an executable application file for reference. Click on the Browse button to start identifying the publisher properties to define a Windows 7 Applocker rule over.
 
In order to create a sample AppLocker rule that can be used by parents as a windows7 parental control. Browse the software application that you want to disallow. The publisher and the product details will be listed as follows:-
  • You can cover a wider range of products of the related publisher by moving the slider upwards. If you move the slider downwards a more detailed filter will be applied. When slider is up a more common filter criteria will be applied for the Win7 AppLocker rule.
                                         Fig7.Reference File Window
  • The next screen Exceptions in the AppLocker wizard will let Windows administrator to define exceptions to the above filter criteria.
  • The last screen in the Applocker wizard enables users to name the Win 7 AppLocker rule and supply a description of the rule for further reference.

    Click the Create button to proceed with the Windows 7 AppLocker rule creation task.
                                 
                                                 Fig.8 Final Display Description Screen

After
the rule is created, this rule will be listed in the Executable Rules list as a new item.This is how the App-Locker feature works.

Thursday, January 3, 2013

Baby named ANDROID of Mother LINUX...


We all know that 'mother' is very important in life of every person. In computer hardware theory also the term 'mother' is of great importance. As every one knows that the major hardware component of computer is 'mother-board'. We all might think why name is given as mother-board, why not father or daughter or son-board? The simple reason behind this is that mother is the person who looks after every chores being carried out. Mother is one who binds some rules for the family. Similarly in case of hardware theory also the name so given is because mother board carries out all the functions. Similarly, in software field also we get to see the 'mother'. In a precise manner we can say that Android is the child of mother Linux-kernel.


         Fig 1. Android with Linux kernel

In today's era, Android is the heartbeat of any handset or machine, but the base behind this huge spreading application is, mother Linux. Why is Linux given so much importance or why is Linux kernel called as the base for the development of android apps??Android is overwhelming. Android integrates Linux kernel at the bottom of its software stack. In fact Android was created on top of Linux Kernel 2.6.

Android is open source, therefore any manufacturer can access it, customize it and adapt it according to the requirements of their own gadget. This is the reason why Android is found on variety of gadgets. With camera, without, high-end and low-end, whether a full-fledged tablet or a low-end entertainment device, Android can run on any platform. This has not only given freedom to manufacturers to customize the operating system, add personalized skin, applications or strip-off default Google services, adapt the OS to run on high/low spec gadget but it has also given freedom to people-freedom of choice. A kernel is the first layer of software that interacts with the device hardware. The kernel is responsible for providing basic architectural model for process scheduling, resource handling, memory management, networking and isolation etc. It must be noted that while Android is built on Linux Kernel, Google has maintained its own forked version of Linux Kernel specifically for android since 2010.
 
                        Fig 2. Architecture of Linux kernel

There are number of reasons for selecting Linux kernel. Linux Kernel boasts some proven core features that are integrated in Android operating system.
Following are some features:

1.      Easily portable: Linux runs on devices of diverse architecture from numerous machines like supercomputers & smaller devices like motor bikes. This is due to the fact that Linux is an immensely portable platform. It is fairly easy to compile Linux on various hardware. What do you think is the major concern of Android? It's that it is picked by many manufacturers and is used on a variety of gadgets. Linux makes that possible. Linux brings Android a level of hardware abstraction. Most parts particularly the low-level ones are written in portable C code that can be accessed and modified by manufacturer easily. This means manufacturers can pick up Android and modify it to adapt it according to their hardware requirements rather that improving the hardware to fit the software.
2.      Essential property: Linux brings to Android some useful features. The Linux Kernel 2.6 includes these features:
Memory Management: While developing for mobile devices memory handling becomes a point of great concern. Thanks to Linux Kernel over which Android is built. You can free yourself from the worry. Linux will handle Linux kernel for-threading and low-level memory management for Android. Linux kernel is responsible to manage the core feature of any mobile device i.e. memory cache. Linux kernel manages memory by allocating and De-allocating memory for the file system, processes, applications etc.
       Fig 3. Baby Android with mother Linux (kernel)
     3.   Other properties:
Process Management: Linux Kernel is responsible to start, stop and execute the program. For a beginner a process can be thought of as an instance of computer program. i.e. whenever a program runs on computer, the OS creates its instance or process for it which is executed by the OS. In case of Android, Linux is responsible to allocate resources to various processes that need them.
Driver Model: As evident this is the layer where all the device specific drivers run. Here Linux ensures that your application is able to run on Android. Hardware vendors can develop their drivers into Linux in a familiar environment. That is giving plenty room for hardware vendors to optimizing OS.

    4.     File System Management:
Linux also manages the file system which in turn controls the data storage service for Android device.

    5.     Network Stack:
Linux Kernel is responsible to communicate with the network. It also controls networking stack, drivers, routing devices and network adapters.

    6.     User account (Security):
Linux kernel handles the security between application and the system. Linux takes control of authentication of users and is responsible for user management. Besides this Linux kernel is also responsible for power management and for undertaking various services like Internet search, voice communication, system logging etc.

    7.     Security:
Linux runs in scientific research labs, supercomputers and systems for mission critical tasks. Android completely relies on Linux for security. All Android applications run as distinct Linux processes under permissions set by Linux system.
Thus we can say that the kernel of the Linux is the back bone for Android technology.